
1. Getting started
Install Fridge Pick from the App Store or Google Play and open it. There is nothing to sign up for, and the app works without an internet connection.
- On first launch you see Welcome with the question Any food allergies? Tap every allergen you avoid, or tap None.
- Tap Save and continue. You can change this any time in Settings → Allergies.
- You land on the home screen with all dishes. A good next step is to open My fridge and tick what you have.
The three icons at the top right of the home screen open My fridge (fridge icon), Week plan (calendar icon) and Settings (sliders icon). The round I’m hungry button at the bottom opens quick suggestions.
2. Home screen and dish cards
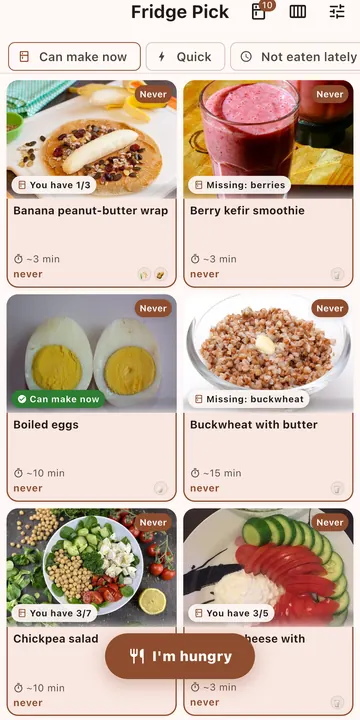
The home screen shows your dishes as photo cards. Dishes you have never made come first, followed by the ones you haven’t had for the longest time, so the grid naturally keeps your meals varied.
Each card can show:
- Name and time, for example “~8 min”.
- When you last had it: “never”, “today”, “3 days ago”.
- A badge: Never (not made yet) or Stale (last made 5 or more days ago).
- A fridge hint once you’ve ticked products in My fridge: Can make now, Missing: tomato or You have 4/7.
- Allergen markers. If a dish contains one of your allergens it gets a red border and a warning badge.
- A small heart if it’s one of your favorites.
Tap a card to open the dish page. Long-press a card for quick actions: Like / Unlike and Hide from menu. After hiding you can tap Undo; later, restore it in Settings → Menu.
3. Filters
The row of chips under the title filters the grid. Scroll it sideways to see all of them. Filters combine: for example, Favorites + Quick shows only favorite dishes that take about 5 minutes.
- Can make now: only dishes you can cook with what’s in My fridge. While your fridge is empty this chip reads From my fridge and opens My fridge so you can set it up.
- Safe for me (appears once you set allergies): hides dishes with your allergens. When it’s on, the chip shows how many dishes are hidden. Turn it off to see them dimmed with a warning.
- Without excluded (appears once you exclude an ingredient): hides dishes that need an excluded ingredient.
- Favorites: only the dishes you gave a heart. If you haven’t liked any yet, the app tells you to tap the heart on a dish.
- Quick: dishes that take about 5 minutes or less.
- Not eaten lately: dishes you have never made or haven’t made for 5 days or more.
- Eggs, Dairy, Pantry, Produce, Protein: food groups. Select one or more to see dishes from any of them.
If no dish matches, tap Clear filters.
4. My fridge
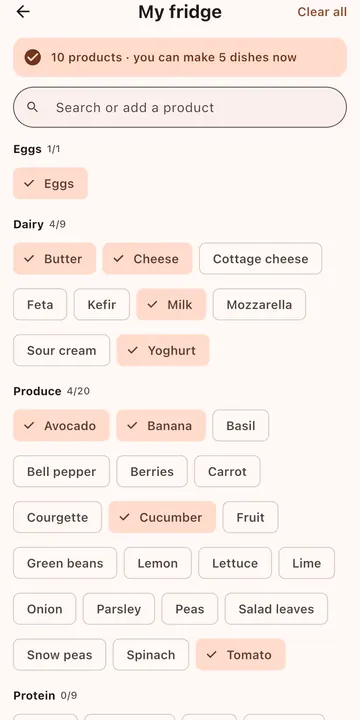
My fridge is the list of products you have at home. Fridge Pick compares it with each dish’s ingredients to show what you can cook right now.
How to fill your fridge
- Tap the fridge icon at the top of the home screen (or Settings → My fridge).
- Tap the products you have. They are grouped as Eggs, Dairy, Produce, Protein, Pantry and Other. A tick means you have it.
- Can’t find something? Type it into Search or add a product. If it isn’t in the list, tap Add “…” to add your own product.
- The summary at the top shows how many products you have and how many dishes you can make now.
Staples. Salt, pepper, oil and water are treated as always at home. If you run out of one, tap it in the Staples group to mark it as missing.
Optional extras, like a few herbs on top, never count as missing.
Start over. Clear all unticks every product (staples are kept). Tap Undo if you did it by mistake.
You can also tick ingredients on any dish page; they are saved to My fridge too.
5. Dish page
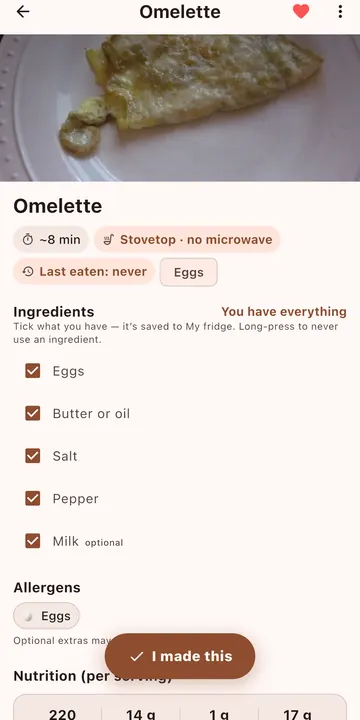
Tap any dish to open its page. From top to bottom you’ll find:
- Photo and quick facts: time, the cooking method chosen for your kitchen (for example “Stovetop · no microwave” or “Steamed · steam over oven”), when you last had it, how many times you made it, and food-group tags.
- Warnings if the dish contains one of your allergens or needs an ingredient you excluded.
- Ingredients with checkboxes and a counter such as You have 3/5 or You have everything.
- Allergens of the dish. Optional extras that may add an allergen are listed separately.
- Nutrition (per serving): approximate calories, protein, carbs and fat.
- Recipe: numbered steps for the method that fits your kitchen.
Tick what you have and shop for the rest
- Tap an ingredient to tick it. Ticks are saved to My fridge.
- Tap the cart icon next to a missing ingredient to add it to your shopping list. It then shows On list.
- Missing more than one? Tap Add N missing to shopping list to add them all at once. Tap Open in the message to jump to the list.
Mark it as made
When you’ve cooked it, tap I made this at the bottom. The dish is marked as eaten today, moves to the end of the home grid, and its Never / Stale badge disappears. Fridge Pick uses this to suggest things you haven’t had lately.
More actions
- Heart (top right): add to or remove from Favorites.
- Share (top right): send a recipe card.
- ⋮ menu: Exclude an ingredient… and Hide from menu / Unhide.
- Long-press an ingredient to Never use it. See Excluded ingredients.
6. Sharing a recipe card
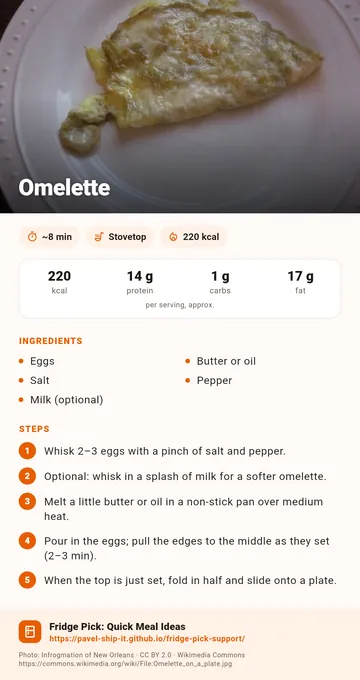
Send any dish to a friend as a good-looking picture card, together with the recipe as text.
- Open a dish and tap the share icon (Share recipe) at the top.
- Your phone’s share sheet opens. Pick a messenger, email, Notes, or save the image.
The card shows the dish photo and name, time, cooking method, calories, nutrition per serving (approximate), all ingredients and all steps. A long recipe simply makes a taller card, so nothing is cut off. At the bottom it says Fridge Pick: Quick Meal Ideas with a link to this website and credits the photo’s author and license.
The recipe steps follow your kitchen settings, just like on the dish page.
7. Favorites
- Tap the heart on a dish page, or long-press a card on the home screen and choose Like.
- Liked dishes get a small red heart on their card.
- Turn on the Favorites filter on the home screen to see only them.
Favorites also count in I’m hungry: dishes you love get a boost and show “You love this”. To remove a favorite, tap the heart again or choose Unlike.
8. I’m hungry
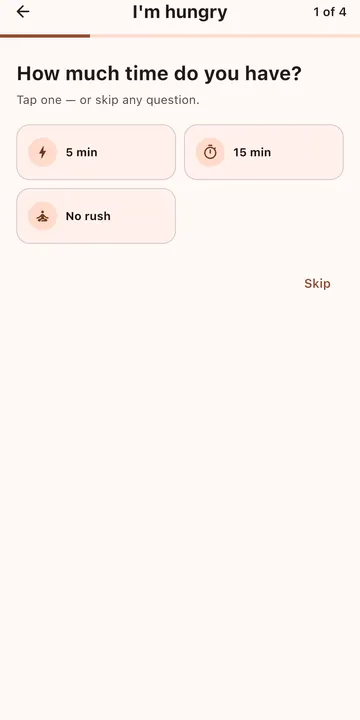
Not sure what to eat? Tap I’m hungry at the bottom of the home screen and answer up to four quick questions. Tap one answer, or Skip any question.
- How much time do you have? 5 min, 15 min or No rush.
- How hungry are you? Just a snack (roughly under 300 kcal) or Proper meal (300 kcal or more).
- What are you craving? Sweet, Savory, Protein-rich, Something light or Anything.
- Use what you have? Choose Use My fridge to put dishes you can make right now first, or pick food groups you have at hand. Then tap Show dishes.
You get 3–5 suggestions under Try one of these, each with a short reason, such as “You have everything”, “You love this”, “Haven’t had it in 9 days” or “Ready in 5 min”. Tap one to open its recipe. Show other options gives you new ideas, and Start over asks the questions again.
Suggestions never include hidden dishes, dishes with your allergens, dishes that need an excluded ingredient, or dishes you can’t cook with your kitchen appliances. If nothing matches perfectly, the closest matches are shown and marked as such.
9. Week plan
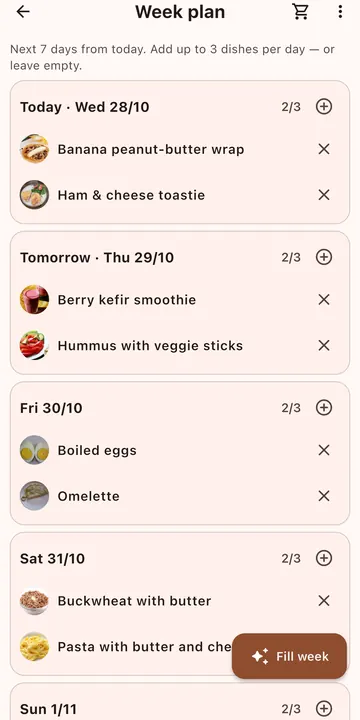
Plan meals for the next 7 days, starting today, with up to 3 dishes a day. Days can also stay empty.
Fill the week automatically
- Tap the calendar icon on the home screen to open Week plan.
- Tap Fill week. Each tap adds one more dish to every day that has room.
- Tap again for a second or third dish per day.
Fill week keeps your existing picks, never puts the same dish twice on one day, spreads dishes across the week, and prefers dishes you haven’t had lately. It only uses dishes that suit your allergies, excluded ingredients and kitchen, and never uses hidden dishes.
Add or replace a dish by hand
- Tap + next to a day to Add a dish. The list is sorted by least recently eaten.
- Tap × next to a dish to remove it. Fridge Pick offers three replacements for that day, each with a hint such as “Can make now” or “Never tried”. Tap one to use it, Shuffle for three more, Undo to put the dish back, or No thanks.
Clear the week
Open the ⋮ menu and choose Clear week to remove all planned dishes for the 7 days.
Automatic clean-up. If you later hide a planned dish, add an allergy or exclude an ingredient, the affected dishes are taken off the plan the next time you open it. A banner tells you how many were removed; tap Suggest replacements to fill the gaps or Keep empty.
10. Shopping list
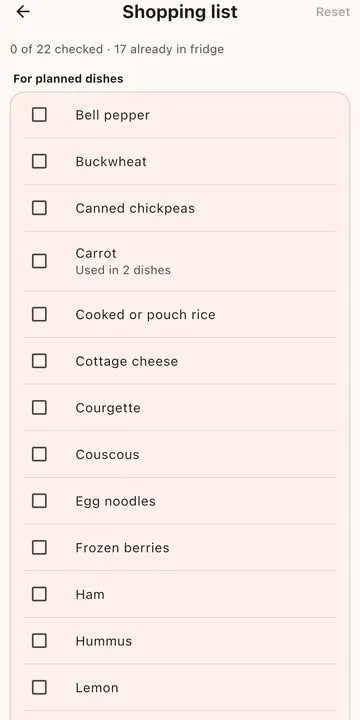
The shopping list is built for you from your week plan, plus anything you added from dish pages. Open it with the cart icon in Week plan, or tap Open after adding an ingredient on a dish page.
- Added by you: ingredients you added from dish pages. Tap × to remove one.
- For planned dishes: every ingredient your planned dishes need, listed once, with how many dishes use it.
- Optional extras: things that are optional in every dish that uses them. Buy them only if you want.
- Already in fridge: products you already have in My fridge, set aside so you don’t buy them twice.
Ingredients from dishes with your allergens and ingredients you excluded are never put on the list. If a line has alternatives, like “Butter or oil”, and you excluded butter, the list just says “Oil”.
Use it in the store
- Tick items as you put them in your basket. The top line shows how many are checked.
- Tap Reset to untick everything for the next trip.
Share the list
Tap the share icon (Share list) at the top. Fridge Pick sends the items you haven’t ticked yet as a text checklist (with optional extras in a separate block), ready to paste into a messenger or notes app.
11. Settings: Menu and your own dishes
Open Settings (the sliders icon) and tap Menu to see every dish in tabs:
- All: every dish.
- Mine: dishes you added.
- Hidden: dishes you hid. Tap Unhide to bring one back.
- Allergies: dishes left out because of your allergens.
- Excluded: dishes left out because they need an excluded ingredient.
The ⋮ button next to a dish lets you Like or Unlike it and hide it; your own dishes can also be edited or deleted.
Add your own dish
- In Settings → Menu, tap Add dish.
- Enter the Name and, if you like, the prep time in minutes.
- Choose the taste (Sweet or Savory), the products groups, and the allergens it contains.
- Type the Ingredients separated by commas, for example “Bread, Peanut butter”, and the Steps, one per line.
- Tap Add dish (or Save). Your dish now appears on the home screen, in suggestions and in the week plan.
12. Settings: Kitchen
Tell Fridge Pick which appliances you have, and recipes adapt to them. Open Settings → Kitchen and switch on what you can use: Stove, Oven, Steam cooker, Microwave, Toaster, Blender.
- When a dish can be made in several ways, the dish page and recipe card show a method you can use. The chip under the dish name tells you which, for example “Steamed · steam over oven”.
- Prefer steam cooker over oven: when both work (eggs, rice and beans, oatmeal…), the steam method is chosen.
- The microwave is off by default and never used unless you switch it on.
- Dishes you can’t cook with your appliances are left out of I’m hungry suggestions and Fill week.
13. Settings: Allergies
Choose your allergens and intolerances from 11 common ones: Gluten, Dairy / lactose, Eggs, Peanuts, Tree nuts, Soy, Fish, Shellfish, Sesame, Celery and Mustard.
- Open Settings → Allergies.
- Tap everything you avoid, or None.
- Decide on Hide dishes with my allergens. On (default): those dishes disappear from the home screen. Off: they stay visible, dimmed, with a red warning badge.
- Tap Save.
Whatever you choose, dishes with your allergens are never suggested, planned or shopped for. If only an optional extra contains your allergen, the dish stays and the page tells you to skip that extra. You can also switch hiding on and off with the Safe for me chip on the home screen.
Allergen information is a convenience based on typical recipes and may be incomplete. Always check product labels. Fridge Pick is not medical advice.
14. Settings: Excluded ingredients
Never cook with olives, mushrooms or fish? Exclude them. Unlike allergies, an excluded ingredient isn’t treated as dangerous: it’s just something you don’t want to use.
Exclude an ingredient
- Open Settings → Excluded ingredients.
- Search for a product or type any ingredient in Search or type an ingredient, then tap it to exclude it.
- Or, on a dish page, long-press an ingredient (or use ⋮ → Exclude an ingredient…) and choose Never use …. The sheet shows how many dishes need it.
- Dishes that need an excluded ingredient are never suggested, planned or added to the shopping list.
- If it’s only an optional extra, the dish stays and the extra is left out (the recipe step says “skip it”).
- If a line has alternatives, like “Butter or oil”, the dish still works with the other option.
- Some words cover a family: “fish” also covers tuna, salmon and sardines; “cheese” covers feta and mozzarella.
- Hide those dishes on home (on by default) hides them from the home grid; you’ll still find them in the Menu’s Excluded tab. The Without excluded chip on the home screen toggles this too.
- To undo, tap Allow next to the ingredient, or Allow … again on a dish page.
15. Your data and offline use
Fridge Pick works fully offline and never connects to the internet. There’s no account, and nothing you enter (fridge products, dish history, favorites, week plan, shopping list, allergies, kitchen and other settings) leaves your device.
To delete everything, uninstall the app. On Android you can also go to Settings → Apps → Fridge Pick → Storage → Clear storage. Details are in the Privacy Policy.
16. FAQ
Do I need an account to use Fridge Pick?
No. There is no sign-up or sign-in. Open the app and start using it right away.
Does Fridge Pick work offline?
Yes. All dishes, recipes and photos are built into the app, and it never connects to the internet. You only need a connection to install or update it from the App Store or Google Play.
Which languages does the app support?
The interface is in English. This website is available in English and Russian.
Why don’t I see some dishes on the home screen?
A dish is left out when you hid it, when it contains one of your allergens (with Hide dishes with my allergens on), when it needs an ingredient you excluded, or when a filter is on. Tap Clear filters if nothing matches, and check the tabs in Settings → Menu to see every dish and why it isn’t shown.
How do I get a hidden dish back?
Open Settings → Menu, go to the Hidden tab and tap Unhide next to the dish. Right after hiding a dish you can also tap Undo.
What counts as “Quick”?
The Quick filter shows dishes that take about 5 minutes or less. All built-in dishes take 15 minutes or less.
What do the “Never” and “Stale” badges mean?
Never means you haven’t marked the dish as made yet. Stale means you last made it 5 or more days ago. Tap I made this on a dish page to update it.
Why don’t the recipes use a microwave?
The microwave is switched off in Settings → Kitchen by default, so recipes use your stove, steam cooker, oven, toaster or blender instead. You can switch it on, but Fridge Pick still prefers other methods when you have the right appliance.
How accurate are the calories and nutrition values?
They are approximate values per serving for a typical version of each recipe: calories, protein, carbs and fat. Your portion and products may differ.
Can I rely on the allergen labels?
Please don’t rely on them alone. Allergen markers are a convenience based on typical recipes and may be incomplete. Ingredients and brands vary, so always check the product labels. The app is not medical advice.
Can I use my data on another phone?
There are no accounts and no sync, so your fridge, plan, lists and settings stay on the device where you entered them. Your phone’s own backup (iCloud or Google) may include app data, depending on your system settings.
How do I delete my data?
You can clear parts of it in the app: Clear all in My fridge, Clear week in the week plan, Reset in the shopping list. To delete everything at once, uninstall the app. On Android you can also use Settings → Apps → Fridge Pick → Storage → Clear storage.
Where do the dish photos come from?
Most are from Wikimedia Commons under Creative Commons licenses, the rest from Unsplash. Authors and licenses are listed on the Photo Credits page.
17. Still need help?
Email me at dreamcomenull@gmail.com. Please include your device model, iOS or Android version, the app version and what happened. More answers are on the Support page.